Basic camera shots and photo framing
if you are a beginner in photography you maybe repeatedly asked yourself what are the rules or the basics i need to follow while taking pictures, because maybe you are taking good shots depending on your own artistic sense or feelings, but you are still afraid of Criticism or afraid of being wrong while shooting a portrait or maybe you just need to develope your artistic sens and imagination by knowing and learning more about the techniques of framing and photography.
in all cases your need will surely drive you to search the internet about good photography tips or buying some good books to learn and to be sure before you start taking your photos and this is a “good thing for you”
but because there are tons of informations, books and theories about the art of photography, and each author is explaining his own point of view and theories about photography, you maybe “get confused” while searching in this huge data base about a stable rule to follow and apply for your own photography work.
typically there are no stable rules to follow in the world of art and invention, especially when it comes to the art of photography, there are no limits to your imagination in this world.
but there are some good advices and few tips that can guide you and prevent you from making wrong decisions while taking your photos and knowing the basics will help you too much in achieving good results.
so before you hold your camera you need to put in consideration the following :
in this article we will talk precisely about the very basics of photo Framing and how to take advantage of these basics and start applying them while framing any subject or object.
take a look on the following scheme to Familiarize yourself with the different types of shots:
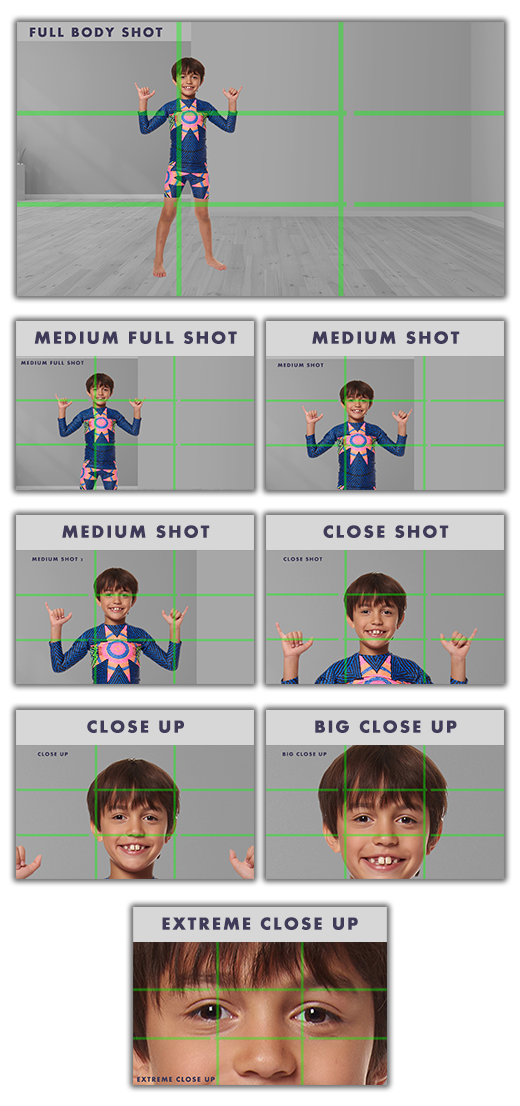
Now let’s explain the rules we need to follow and how each type of shot must be taken by knowing the specifications of each shot.
Full body shot :
as the title describes it, it’s a full shot of the subject you are filming, one thing important is to leave some headroom above your subject on the top of the image.

Medium Full Shot:
usually taken Above the knees of your subject, and mathematically you take nearly the 2 upper thirds of your subject in the frame while also leaving some headroom above the top of your subject.

Medium shot:
usually to take a medium shot you need to align the bottom end of your frame with the waist of your subject, and it’s a shot that representing the upper half of the subject inside the frame.
leaving some headroom above your subject is always required.

Closer medium shot:
a closer Medium shot is usually taken a little bit above the waist, and it’s representing the upper third of the subject while respecting the headroom above your subject.

Close shot:
usually taken Under the shoulders and above the chest and it’s representing the head and shoulders of your subject.

Close up:
the close up is usually taken above the shoulders and under the neck of the subject and it’s a shot that representing the head and the neck of your subject while leaving a little bit of headroom on the top.

Big Close up:
a big close up is representing the face of your subject not the entire head and usually taken in between the Chin ( under the mouth ), and the above of the front.

Extreme close up:
an extreme close up can represent the eyes of your subject or the mouth of your subject so you are free in extreme close ups shots as you can for example film just one eye in your frame, that’s why its called an extreme close up.

After knowing these basic types of shots,and framing whatever form your image will be,( square pixel , rectangular, or cercular, or even pyramidal, ) automatically applying these basics will help you in framing your subjects correctly.


you can also use the same basics while framing other subjects than humans for example a vase of flowers, a tree, or different kind of animals. see the examples bellow :


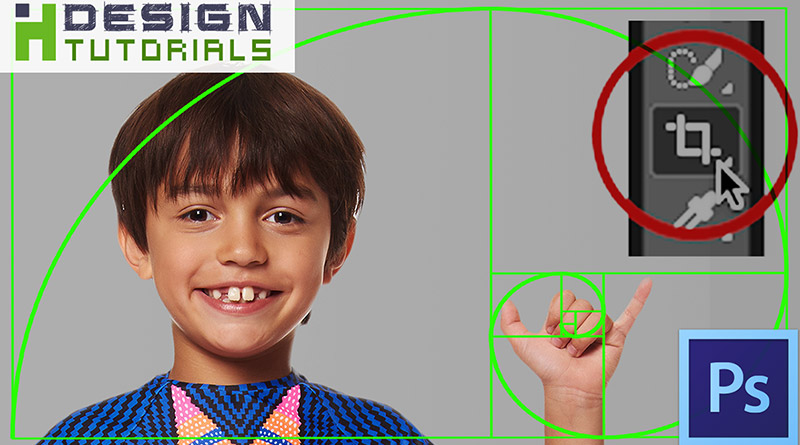
you can also watch the following video tutorial to see how you can use the Crop tool in photoshop to easily correct the framing of your photos and See how you can take advantage of the crop tool in Adobe Photoshop to align your camera shots and correct photo framing by using the different types of compositions included with the Crop Tool ( rule of thirds , Grid , Diagonal , Triangle , Golden Ratio , or Golden Spiral )