Unblur and restore any human face using DFDNet

Unblur and restore any human face using DFDNet

Unblur and Restore any human face using DFDNet

Discover DFDNet , a new solution to unblur , restore and upscale almost any human face using the power of artificial intelligence and machine learning.

In this guide we will discover together a new amazing solution to de-blur and restore almost any human face using DFDNet open source project code.

DFDNet is an AI program created in python language to solve and reconstruct or restoring human faces using a pre-trained intelligent application that is relying on 16 dictionaries containing a huge data base of high quality images and multi-scale facial Components like eyes , noses and mouthes to recompose almost any human face.

The original title of the source code project is ( “Blind Face Restoration via Deep Multi-scale Component Dictionaries” ) and it’s created by a team of chinese students and profs , you can read more about the main author of DFDNet, “Xiaoming Li” on his page Here: https://csxmli2016.github.io/

How to install and test DFDNet on Windows 7 or Later

First watch the DFDNet installation tutorial then continue reading the article to download the necessary installation files.

Unblur and restore any human face using DFDNet

To install and test DFDNet on your Windows Pc it’s easy but first make sure you have at least 6 GB of available memory on your computer to run the code without any errors.

STEP 1

First of all you need to take a look at the source code page here :

https://github.com/csxmli2016/DFDNet to read more and understand how the project works, also getting an idea about its license , DFDNet is licensed under a Creative Commons Attribution-NonCommercial-ShareAlike 4.0 International License. http://creativecommons.org/licenses/by-nc-sa/4.0/

To make things easier for you i’ve collected both the “Source Code” and the “Pre-train Models and dictionaries” in one Zip Folder Here :

Please Note : before downloading any file on this article notice that all the softwares , applications , or and the DFDNet open source code it self are the property of their respective owners , Don’t modify , edit , sell , or recompile any software applications or codes until you visit the original rights owners or developers and have their full permissions , all the files hosted here in this post are shared for educational and testing purposes and to preserve the necessary installation environment to test DFDNet.

STEP 2

After downloading the DFDNet.zip file , extract the compressed folder to your ( C:\ ) drive root.

STEP 3

Now to run the source code on your windows computer i’ve already prepared and compiled the necessary python environment to save you time and making it easier for you , so that you will only need to download and install Anaconda then activate the necessary DFDNet environment from the “Anaconda Prompt“.

So first download and install Anaconda From Here :

Note: During the Anaconda setup set the “install option” to “just me ( recommended )” and then set the destination folder for the installation to the following path : C:\Users\”Your User Name”\Anaconda2
then leave all the other settings that follows during the installation as is and proceed.

STEP 4

after downloading and installing Anaconda properly on your computer now you should download the ready Environment and the .cache folders

Download the ready to use Environment Here :

Download the .cache folder here

STEP 5

Extract the ready env.zip file , then open the extracted folder and then copy or cut the testDFDNet folder and paste it inside your Anaconda installation folder in the “envs” folder exactly in this path C:\Users\”Your User Name”\Anaconda2\envs\

Also don’t forget to extract the cache.zip file and open the extracted .cache folder then you will find another .cache folder inside it copy it and paste it in your actual user folder exactly in this path C:\Users\”Your User Name”\ “the same directory in where we’ve installed Anaconda”.

STEP 6

Download and install the Microsoft Visual C++ Redistributable

Now you are almost done and ready to run and test DFDNet on your PC.

Running DFDNet source code

1- Before you can run DFDNet first you need to put the photos you want to restore or unblur in the following path ( “C:\DFDNet\DFDNet-whole\TestData\TestWhole” ) this is the default folder for the input images.

2 – After done all the previous steps correctly go to your Start Menu from the bottom bar and run the Anaconda Prompt.

3 – in the Anaconda Prompt black screen type in or copy\paste the following command “conda activate testDFDNet” then hit Enter on your keyboard, this will activate the ready necessary environment for DFDNet.

4 – Now type in the following command to go to the project folder “cd C:\DFDNet\DFDNet-whole” then hit Enter on the keyboard.

5 – to start the image processing task type in or copy\paste this full command line in your Anaconda Prompt screen:

python test_FaceDict.py –test_path ./TestData/TestWhole –results_dir ./Results/TestWholeResults –upscale_factor 4 –gpu_ids -1

Note : This process may take a little while 1 to 5 minutes for each photo it depends on your computer cpu speed.

6 – Finally find the result processed images in this path : C:\DFDNet\DFDNet-whole\Results\TestWholeResults\Step4_FinalResults\

if for any reasons you got error messages or failed to run DFDNet with the Environment that i’ve made, then maybe you need to go through the whole installation method which is described in the following YouTube video :

Before watching the complete DFDNet installation tutorial you will need to Download ” VISUAL STUDIO ” and ” Cmake ” to compile and install the DFDNet Environment from scratch, so i wanted to make your life easier here are both installers so that you can follow along with the tutorial in a velvet glove.

DFDNet Installation Tutorial

i hope this guide was helpful for you, Thank you for taking your time reading and watching the tutorials , if you have any questions or thoughts regarding the Tutorial please Contact us or leave us a comment below, we will be glade hearing from you.

Please make sure you follow our pages on pinterest and facebook as well subscribe to our youtube channel to get informed each time we post new articles and tutorials.

hdesigntutorials

14 thoughts on “Unblur and restore any human face using DFDNet

  • October 25, 2020 at 3:22 pm
    Permalink

    Very nice tutorial

    Reply
  • February 19, 2021 at 1:23 am
    Permalink

    test_FaceDict.py: error: unrecognized arguments: -test_path ./TestData/TestWhole -results_dir ./Results/TestWholeResults -upscale_factor 4 -gpu_ids -1

    Someone can help me?

    Reply
    • February 21, 2021 at 2:43 pm
      Permalink

      Hi , if you are encountering any errors to run DFD Net then there is something missing in the installation try to delete everything and watch the full installation tutorial , installing from the beginning may solve your problem.

      Reply
  • March 12, 2021 at 7:31 am
    Permalink

    python test_FaceDict.py –test_path ./TestData/TestWhole –results_dir ./Results/TestWholeResults –upscale_factor 4 –gpu_ids -1 Help me please, ihad install again but it failed 🙁

    Reply
  • March 13, 2021 at 6:14 pm
    Permalink

    I have to say, I’m stunned.
    Took me hours to get through your tutorial because A: I’ve never used this software before, B: you were going way too fast for me and I kept having to pause and C: I’m getting old!
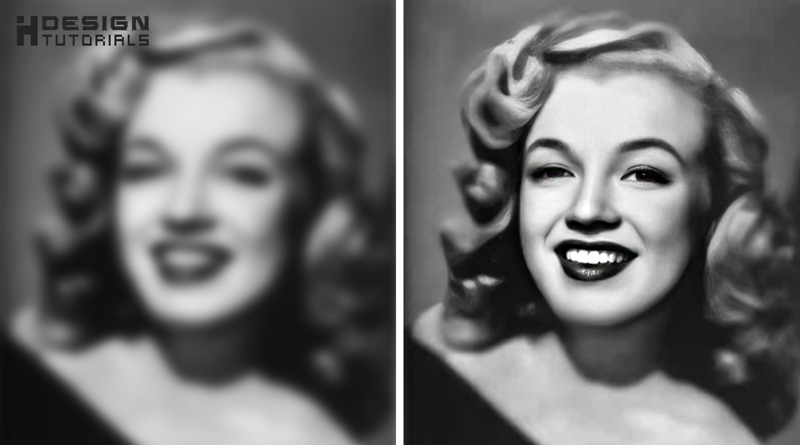
    I just ran a highly cropped image of my grandfather from the 1950s through this and what I got was practically a portrait! So, thank you for the tutorial, frustrating as it was!

    Reply
  • July 5, 2021 at 8:57 am
    Permalink

    Thanks for making this! At first I kept getting errors, but found that the “running commands” text had an error. I fixed it to “testDFDNet” and it worked.

    conda activate testDFDNet

    cd C:\DFDNet\DFDNet-whole

    python test_FaceDict.py –test_path ./TestData/TestWhole –results_dir ./Results/TestWholeResults –upscale_factor 4 –gpu_ids -1
    —-

    Now I found that after first photo enhancement, the result folders keep the finished ones in there. So even if I remove the fist photo from the TestData folder and put another photo there, I kept getting errors because it tries to find the deleted photo as well during the process. I had to go to Results folders and delete the finished ones manually. Is there a way to do it automatically? Thanks.

    Reply
  • September 23, 2021 at 7:03 am
    Permalink

    How do i make this thing working on a AMD Video Card?

    Reply
  • April 16, 2022 at 4:08 pm
    Permalink

    The command to start processing should be

    python test_FaceDict.py –test_path ./TestData/TestWhole –results_dir ./Results/TestWholeResults –upscale_factor 4 –gpu_ids -1

    Note the double dashes before each argument. The code in tutorial shows single dashes and throws an error in Windows.

    Reply
  • April 16, 2022 at 4:17 pm
    Permalink

    The comment system has changed the format of my post, my above reply shows the incorrect code as a result. If you are having trouble running script with error messages about unrecognized argument. Then change the single dash in front of each argument to double dash.

    Reply
  • April 25, 2022 at 12:43 pm
    Permalink

    Your tutorial let me unblur my photo, the blur photo can not mofy by Photoshop. I creat two bat for easy runing.
    I take the unblur face part photo into Photoshop, comb. the org photo, the photo is very good.
    Thank you very much.

    run.bat
    cd C:\DFDNet\DFDNet-whole
    conda activate testDFDNet

    run1.bat
    python test_FaceDict.py –test_path ./TestData/TestWhole –results_dir ./Results/TestWholeResults –upscale_factor 4 –gpu_ids -1

    Reply
  • February 19, 2024 at 2:36 pm
    Permalink

    Hello from Happykiddi.

    Reply
  • February 20, 2024 at 12:38 pm
    Permalink

    Hello guys, glad to join you

    Reply

Leave a Reply

Your email address will not be published.