How to add background to image in photoshop

How to add background to image in photoshop

How to add background to image in photoshop

Hello and welcome to this new Photoshop tutorial, brought to you by hdesigntutorials.com

In this tutorial, you will learn how to add background to image in Photoshop, using the powerful Contextual Task Bar. We will walk through the entire process step by step, from importing your image to exporting the final result.

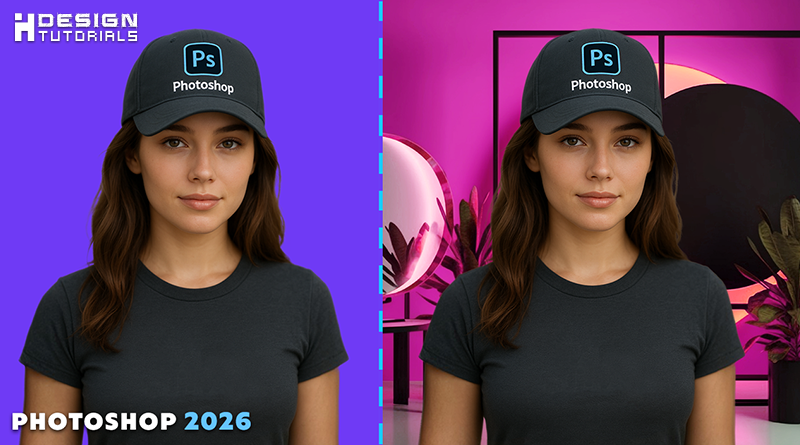
Adobe Photoshop 2026 has made background removal and replacement faster and more intuitive than ever. Thanks to the Contextual Task Bar, many of the steps that once required advanced knowledge are now accessible with just a few clicks.

In this complete, step‑by‑step guide, you’ll learn how to remove a background and add a new one behind a subject in Photoshop 2026, using modern, AI‑powered tools while maintaining professional‑quality results.

What Is the Contextual Task Bar in Photoshop 2026?

The Contextual Task Bar is a smart floating panel that appears automatically when Photoshop detects what you’re trying to do. It offers relevant actions based on:

  • The selected layer

  • The presence of a subject (person, object, animal)

  • The current tool or workflow

When working with backgrounds, the Contextual Task Bar typically includes options like:

  • Select Subject

  • Remove Background

  • Add Layer Mask

  • Refine Selection

  • Generative Fill

This eliminates the need to navigate through multiple menus and significantly speeds up your workflow.

Step 1: Open Your Image in Photoshop

Once you run Adobe Photoshop 2026, navigate to the folder where your photo is saved. Simply drag and drop the image directly into Photoshop to open it.

This is the fastest way to load images into your workspace.

Step 2: Enable the Contextual Task Bar

Make sure the Contextual Task Bar is visible:

  1. Go to the Window menu

  2. Ensure Contextual Task Bar is checked and enabled

The Contextual Task Bar will appear near your subject and provide smart editing options.

Step 3: Remove the Background

With your image selected:

  1. Click Remove Background in the Contextual Task Bar

Photoshop will automatically detect the subject and remove the background behind it using AI.

Step 4: Import a New Background

After the background is removed:

  1. Click Import Background from the Contextual Task Bar

  2. Select your background image

  3. Click Place

The new background will be added behind your subject.

Step 5: Resize and Position the Background

To adjust the background:

  • Press and hold Space Bar + Alt, then click to zoom out

  • Move and resize the background freely until it fits your composition

Take your time to position the background exactly the way you want.

Once you are satisfied, click Done.

Step 6: Zoom In for Fine Adjustments

To zoom back in:

  • Press and hold Ctrl + Space Bar, then click to zoom in

This allows you to inspect details and edges more closely.

Step 7: Blur the Background (Optional)

To create depth and focus on the subject:

  1. Select the background layer

  2. Go to Filter → Blur → Gaussian Blur

  3. Adjust the blur amount to your liking

  4. Click OK

Blurring the background helps make the subject stand out naturally.

Step 8: Refine Subject Edges

If the edges of your subject are not perfect:

  1. Select the subject layer

  2. Click Select Subject

  3. Click Modify Selection, then choose Select and Mask

Inside the Select and Mask window:

  • Increase Smooth slightly

  • Increase Feather slightly

  • Decrease Shift Edge to refine the selection

Once done, click OK.

Step 9: Remove Outer Edge Artifacts

To clean up remaining edges:

  1. Go to Select → Inverse

  2. Press the Delete key on your keyboard

  3. Click Deselect to clear the selection

This removes unwanted outer edges around the subject.

Step 10: Export Your Final Image

To save your work:

  1. Go to File → Export → Save for Web

  2. Choose JPEG format

  3. Set Quality to maximum

  4. Click Save

  5. Give your photo a new name

  6. Click Save again

You will find your exported image in the selected folder.

Watch the full video tutorial on YouTube

Final Words

That’s it! You have successfully learned how to add background to image in Photoshop 2026 using the Contextual Task Bar.

You are now a Photoshop master

Thanks for reading this tutorial, and don’t forget to check out more guides at hdesigntutorials.com

i hope this guide was helpful for you, Thank you for taking your time reading and watching the tutorial , if you have any questions or thoughts regarding the Tutorial please Contact us or leave us a comment below, we will be glade hearing from you.

Please make sure you follow our pages on pinterest and facebook as well subscribe to our youtube channel to get informed each time we post new articles and tutorials.

hdesigntutorials

Leave a Reply

Your email address will not be published. Required fields are marked *