Objects removal and background recovery Photoshop training

Objects removal and background recovery Photoshop training

Objects removal and background recovery Photoshop training

in this photoshop training course we will learn together the basic methods and techniques on how to remove objects or persons from pictures using the basic tools in Adobe Photoshop.

Also we will learn how to use the clone stamp tool and the healing brush tool to recover , repair and restoring the background behind the removed object.

throughout this Photoshop training course constituted of 5 detailed video tutorials we will explain different tools and techniques inside photoshop that will allow us to delete anything from a photo and then recover the background in a professional way that no one can detect the manipulations applied on the image and thats very important because if you can’t fool the eye of the viewer and make the spectator believe that the photo is real then your photo manipulation is unnecessary or not at the needed level of persuasion.

so this Photoshop training course is precisely explaining the required techniques that will make you able to achieve that level of realism in your photo manipulations and create perfect fakes or let’s call it photo tricking that no one can detect.

we will start our course with a basic photo manipulation video tutorial to quickly understand and take an overall look on how objects removal & background recovery can be easily done in Photoshop.

1- The basic techniques of photo manipulation in photoshop

in this tutorial we will start by cutting the upper part of the subject then we will recover the background , also we will heal or recover the lost upper portion of the subjects pantalon by importing the lost content from another pantalon and then merging and mixing then color correcting the imported material to mix it with the pantalon that we already had in the image.

Overview :
  • using the Pen tool to cut the upper half of the subject
  • using the Clone stamp tool to reconstruct the corrupted background
  • using the pen tool to select and copy content from another image
  • using Hue and saturation parameters to calibrate colors
  • using the clone stamp tool to mix and blend different elements
  • using the burn and dodge tools to correct the lighting

Please watch this tutorial in full screen mode to be able to read the comments.

After completion of the previous guide now you know what are the principal tools used to remove an object from a photo and how to reconstruct and recover the background area from where the object has been removed.

For Notation the principal tools used are :

1 – The “Pen tool” to select the content.
2 – The “Clone Stamp tool” to recover the background.

Now before we move on the the next tutorial you can go and grab a photo from Google.com or use any picture of yours and try using both the “Pen Tool” and the “Clone Stamp” tool to delete something from a photo, practicing is your key to have a better understanding on how the tool works practicaly inside of Adobe Photoshop.

2- Changing the background behind transparent dress Photoshop

in this fast tutorial we will take a look on another important lesson in Photoshop , a brief explanation on how to deal with transparent objects and materials like gauzy garments or clear glass and how to change the background behind that kind of stufs or in another word how to cut a transparent material from an image into one another while keeping the aspect the same.

Note that : the tips described in this tutorial works fine when the background behind the transparent object contains unified colors like full white or black , otherwise a background that contains complex colors makes it hard for you to deal with.

Overview :
  • using the quick selection tool to remove the background
  • using the quick selection tool to separate the transparent portions from the subject
  • using opacity to recover the transparency

3- Remove a person from your photo in Photoshop CC

in this tutorial we will entirely remove a person from the photo , this tutorial describes another tactics or method on how to reconstruct the background using the power of selection in photoshop to precisely control and limit the ares in where the clone stamp tool will be used to heal the background.

Overview :
  • using the pen tool to create a precise shape around the subject
  • duplicating the shape to copy content from another portion in the background
  • precisely replacing the subject with the copied background
  • using the clone stamp tool to clean and the background

Before we go to the final tutorial in this Photoshop training course , fastly let’s discover another powerful tool in photoshop which is the spot healing brush tool.

The Spot Healing Brush tool is usually used beside the Clone Stamp Tool in photoshop it’s a compliment that can’t be abandoned during the process of healing and recovering the background or any corrupted thing in the image.

The Spot Healing Brush tool is another fast and quick way to fix or hide any undesired elements in the photo. so , let’s have a quick overview about this great tool in Adobe Photoshop.

4- Photoshop yourself next to your favorite celebrity

Time for some action ! it’s time to exploit all the previous tips and techniques in one another great advanced toturial on how to use Adobe Photoshop to put yourself in the picture beside your beloved stars and celebrities.

So let’s discover the basic photo manipulation techniques on how to put someone in another image and create a fake that no body can detect , in this fully detailed video tutorial we will learn the following :

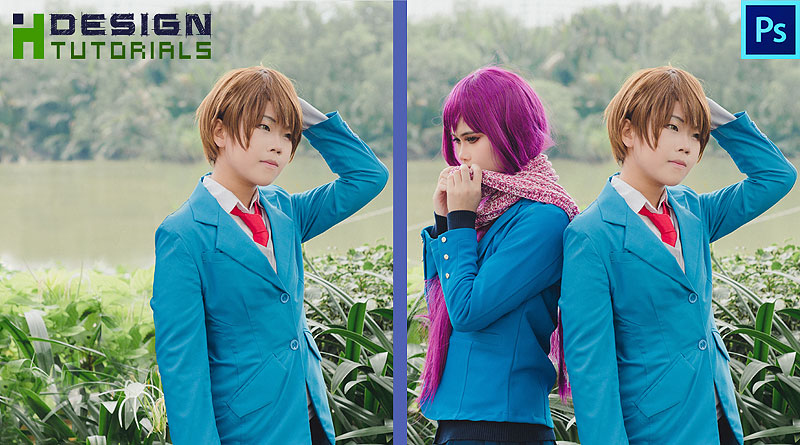
1- how to cut out a person from a photo and place him/her in another photo with someone else.

2- how to enhance the look of hard and edgy hair cutouts.

3- how to use the brush tool to create or recover the lost hair contour.

4- how to color correct and calibrate the colors of two different photos.

5- how to calibrate the quality difference between photos.

After all i hope you have been enjoyed while reading and watching the tutorials in this training course and thank you for the time you have spent in reading this article.

Please make sure you follow our page on facebook and subscribe to our youtube channel to get informed each time we post new articles and tutorials.

Leave a Reply

Your email address will not be published.