How to depixelate images in photoshop
How to depixelate images in photoshop
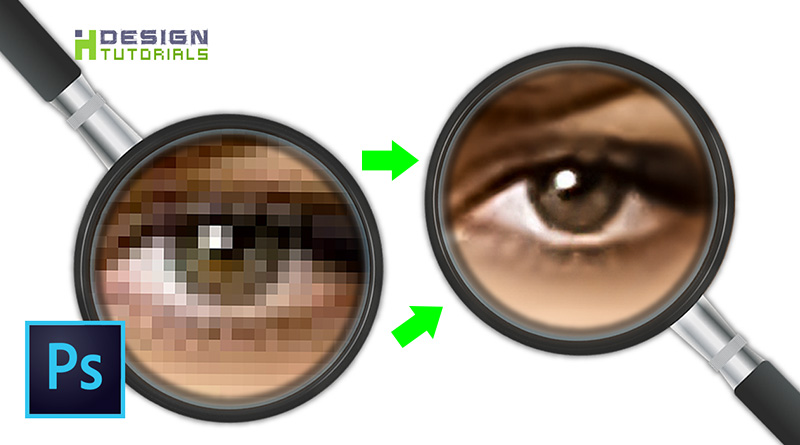
Quick tutorial on how to depixelate images in Adobe Photoshop. learn how to improve a small resolution photo and prepare it for high quality prints and productions in a very easy tutorial to follow.
this quick and very effective tutorial is explaining how to use the image Resampling technology built in Adobe photoshop for upscaling digital images into a higher resolution to make the image ready for high quality print or any other digital productions.
this quick guide is explaining a must do process to enhance and improve the quality of low resolution images before going to the next step of any kind of physical or digital productions.
this guide is made to prevent a very bad situation i still remember when i was working for a print company when one of my work team members was asked to provide one of our clients a print document for an X Banner ,
the client was about to print 20 X Banners for an urgent international Exhibition , so he provided my team member with some low resolution company Logos to be placed on the print !
after that my colleague have just placed those logos inside the print document and since that time he was using Adobe illustrator to create the visual for the client so he enlarged the scale of the logos inside an already scaled print document without paying attention that the real print size is bigger than the document scale so he didn’t realize that the logos are not in the 100% print scale or real print size and that’s because he was working on an approximate size document or what we call scaled document size so he wasn’t able to determine whether if the logos are in good quality or not.
after that the order was delivered to the printer and after wasting 20 X Banners BOOM the order was rejected by the client after he find out that all his logos was fully pixelated.
that day the consequences was crucial and the situation was very embarrassing for both the company and my team mate and after this huge mistake , The team manager decided to deduct ink costs and any other losses from my colleague at work because of his mistake.
So since then i learned a very firm rule that i can’t forget and today i am sharing this rule with you in a really quick but very important guide.
Never print a photo without improving its quality
How to depixelate images in photoshop
yes a photo that does not meet the required print resolution quality will look Pixelated when printed so you should always prevent this from happening and making sure that images in your print document are ready for big print size.
in Adobe Illustrator before proceeding and sending the document to the printer you can check if your image is print quality ready or not by going to “View Menu” and click on “Actual Size” , also you can click on “Proof Colors” from the same menu to check the real colors in your document.
if you are using Adobe Photoshop to create your documents for print you can go to “View” menu and select “Print Size” from the list to check your images quality before print.
also there are different situations that creates the need to improve the quality of an image maybe you want to make your old low resolution photos look clearer or maybe you want to zoom in a specific spot in the image like an eye or a mouth surely if the photo you are trying to zoom in is a low resolution image then this tutorial is for you, and that’s because the process described in this tutorial also works fine as a photo restoration solution.
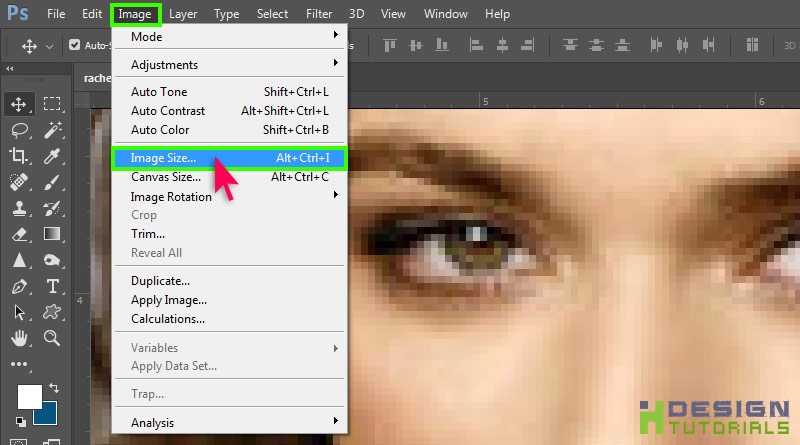
1- Open your low resolution in Photoshop CC 2017 and then go to Image menu and select Image Size… From the List.
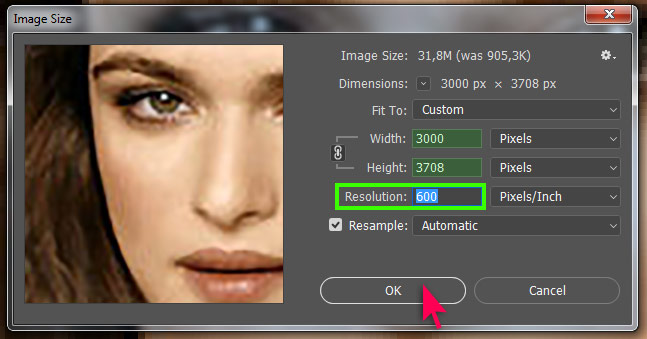
2- in the Image Size window increase the Resolution until you reach at least 3000 pixels in height or in width , and set Resample to Automatic then click OK.
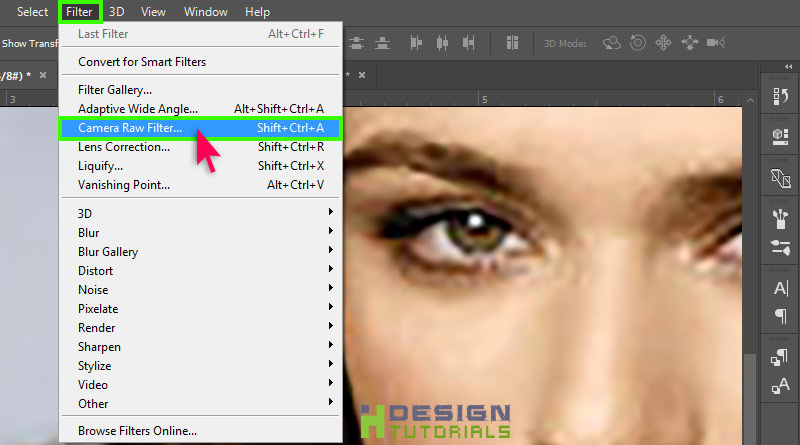
3- go to Filter menu and select Camera Raw Filter from the list.
4- in the Camera Raw Filter window first switch to the Detail tab then try to apply the following parameters :
– in Sharpening parameters :
- set Amount to : 100
- set Radius to : 1,5
- set Detail to : 10
- set Masking to : 0
– in Noise Reduction parameters :
- set Luminance to : 65
- set Luminance Detail to : 0
- set Luminance Contrast to : 0
- set Color to : 100
- set Color Detail to : 0
- set Color Smoothness to : 100
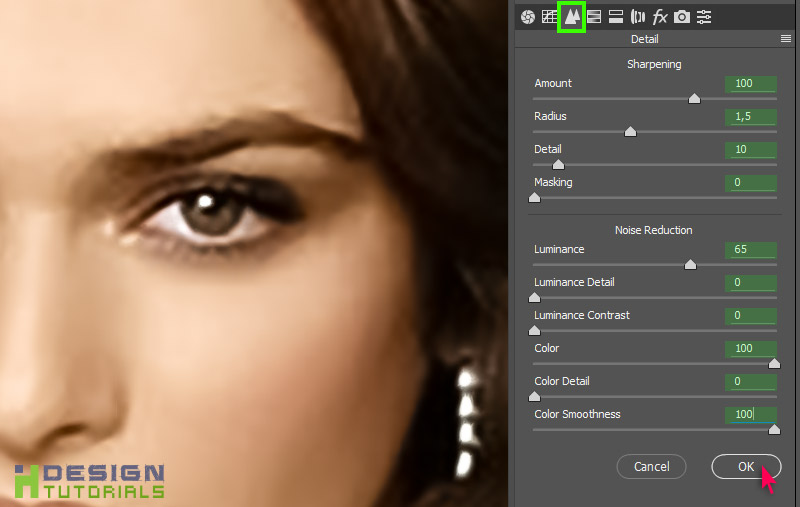
Note That : if the above settings doesn’t work properly for your image, you can try to slightly change the values while looking to your image until you get a satisfying result.
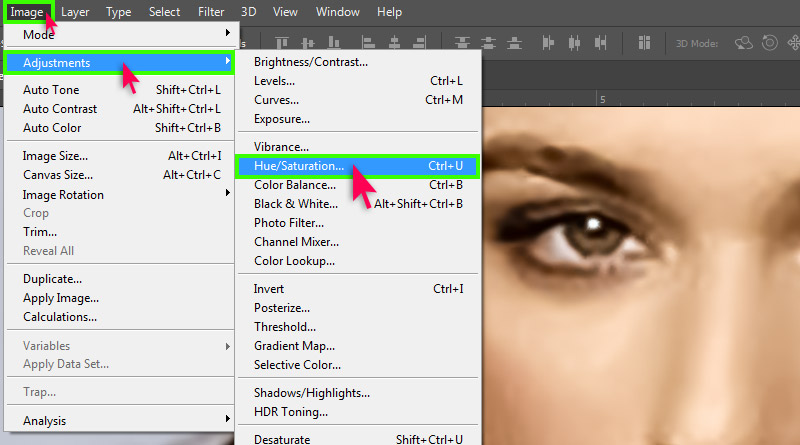
5- finally after applying the Color Noise Reduction filter, you may end up losing a little amount of saturation, to fix this go to Image menu — Adjustments — Hue/Saturation.
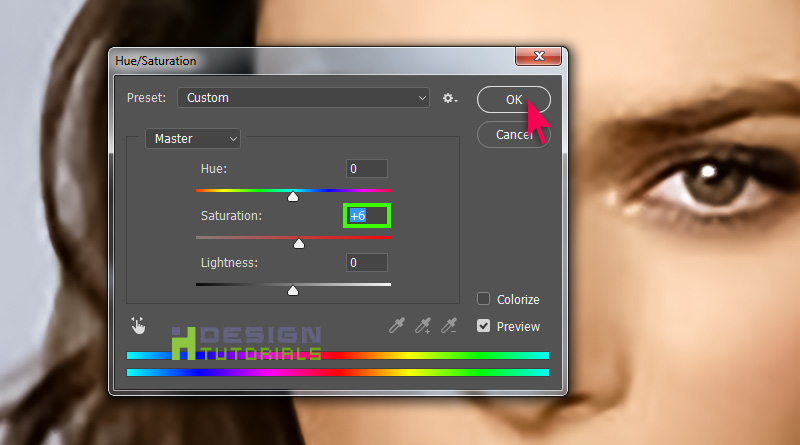
6- in the Hue/Saturation window increase the Saturation to +6 then click Ok.
i hope this guide was helpful for you, Thank you for taking your time reading and watching the tutorial , if you have any questions or thoughts regarding the Tutorial please Contact us or leave us a comment below, we will be glade hearing from you.
please make sure you follow our page on facebook and subscribe to our youtube channel to get informed each time we post new articles and tutorials.


HOW TO MAKE A BABY????