Selection in Photoshop the complete guide

Selection in Photoshop the complete guide

Selection in Photoshop the complete guide

in this guide we will explain everything you need to know about selection tools in Adobe Photoshop , as well mastering the selection using the Pen tool.

let’s start by explaining several important commands & shortcuts in the Select menu in Photoshop.

Select Menu :
  • Select AllPcCtrl+A // Mac – Command+A : to wrap a selection around the entire document.
  • DeselectPc – Ctrl+D // Mac – Command+D : to deselect.
  • ReselectPc – Shift+Ctrl+D // Mac – Shift+Command+D : to reselect again the last selection made.
  • InversePc – Shift+Ctrl+I // Mac – Shift+Command+I : to inverse the selection of an object and select the content around it instead of the object it self , Example when you make a selection around a person and you want to select the background behind him instead , you can go to Select Menu and choose Inverse to select the content around that person instead , then you can tap the Delete key to remove the background.
  • All LayersPc – Alt+Ctrl+A // Mac – Option+Command+A : to select all the layers available in the document.
  • Select and MaskPc – Alt+Ctrl+R // Mac – Option+Command+R : to open the Select and Mask window.
  • FeatherPc – Shift+F6 / Mac – Shift+F6 : the Feather parameter help you creating a fade to transparent edges selection with smooth corners.
  • Transform Selection : after selecting something you can go to Select menu then choose “Transform Selection” from the menu to transform , resize , and manipulate the selection like you would.
  • Load Selection : to load your saved selection.
  • Save Selection : to save your selection. then load it and use it later.
The Move Tool

( Short key ” V ” )

in Adobe Photoshop we can use the Move Tool to individually select and move a layer or to select multiple layers inside the document the same way you are selecting folders and files on your Desktop.

Also you can use the Move Tool to select a Group of layers and move all the layers inside a Group folder at once easily by changing the option from Layer To Group.

The Marquee Tool

( Short key ” M ” )

Using both the Rectangular Marquee Tool and the Elliptical Marquee Tool is one of the fastest & easiest ways to select an object or an element in a photo inside your Photoshop document , both tools can be used to select or to create ( Square , Rectangular , Circular and Oval.. ) shapes or selections.

Examples :

for Example you can use the Rectangular Marquee Tool to easily select square or rectangular objects like cards.

the Rectangular Marquee tool is the best and the fastest way to select then rotate or resize or even remove an object from a photo when the background contains one unified color.

After selecting around something , tap Ctrl+T / Command+T to transform the selected content as shown !

in Photoshop the Rectangular Marquee tool can be the best solution to perfectly select a rounded corners rectangular card.

For Example : while the Rectangular Marquee Tool is in use you can set The Feather to 7 pixels to create a perfect selection with rounded corners as shown.

Also you can fastly use the Elliptical Marquee tool to select circular objects like Shirt Buttons or watches or oval objects like an Egg , etc…

Things to try out :

while using the Marquee Tool Hold Alt+Shift Keys on the keyboard then click and drag to create a proportional circle or square or Hold only the Shift key.

also you can set how the Marquee Tool Draws by changing the Style to : Fixed Ratio like 1 by 1 to draw a square with equal ribs or a Fixed Ratio circle , also change the Style to : Fixed Size to automatically draw a fixed size geometrical shape of your choice.

Selection Rule :

Draw a selection then Hold “Shift” key then draw to add another selections or hold “Alt” key then draw on a selection to delete a portion from it.

The Lasso Tool

( Short key ” L ” )

the Lasso tool is one another different selection tool in photoshop the Lasso is a Manual selection tool that usually works great when using Graphics Drawing Tablets or monitors that comes with a pen to manually draw selections by hand.


the Lasso tool can be used to freely draw any kind of selections and create any kind of forms , it can be very helpful for professional painters that are working with their hands to create designs.


there is also the Polygonal Lasso Tool which can be used to draw straight connected lines to create straight geometrical selections or shapes , and the Magnetic Lasso Tool which sticks to the edges of an object based on the difference between colors but , in my opinion , the Magnetic Lasso Tool works fine only to select simple objects and it can be hard to control when dealing with complex selections.

The Magic Wand Tool

( Short key ” W ” )

The Magic Wand Tool is a quick , easy and powerful tool that works fine for instantly and automatically selecting an area which contains a similar range of colors.


its parameters & precision makes it one of the mostly used selection tools that works great in many situations when the photo does not contain many differences between color ranges , so its simplicity of usage makes it a fast solution for selection but not an advanced way to select when the photo contains complex color variations like gradients or many textures.


The Magic Wand Tool could be the best choice and the fastest solution to for example selecting patterns or floral designs or to select text when the background color is unified, The Magic Wand Tool can Help you saving time selecting that kind of stuffs.

The Quick Selection Tool

( Short key ” W ” )

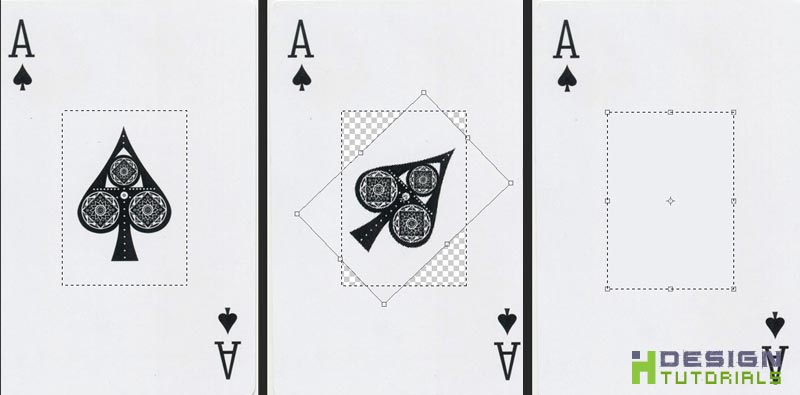
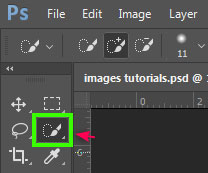
The Quick Selection Tool came as an extension for its successor The Magic Wand tool but with slightly more advanced functionalities , the Quick selection tool works the same way as The Magic Wand but with the ability to manually control what to select and what not to select.

The Quick Selection Tool can be used as a brush to manually draw and quickly select around the edges of your subject , you can change the Size , the Hardness and the spacing of the brush to have more control and precision when dealing with tight areas in an image , as well you can hold Alt or Shift keys to modify your selection at any time.


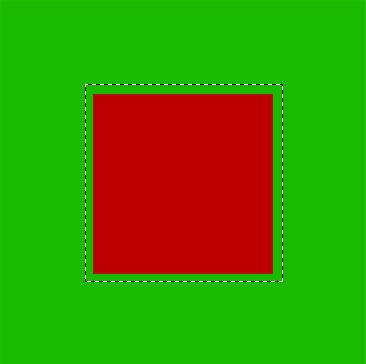
while the Quick Selection Tool is employed you can hold “Alt” on the keyboard then click to Subtract areas from your selection.

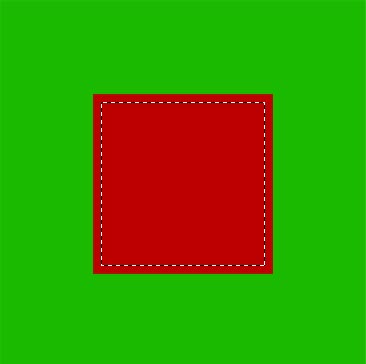
also you can hold “Shift” then click to add areas in your selection.

and Hold “Ctrl” then click and drag to move the entire selected content anywhere else inside your Photoshop document.

The Pen Tool

( Short key ” P ” )

The Pen Tool is the most powerful , advanced and accurate tool to manually create a path and select any kind of complex subjects like human hair or trees and doing any other advanced selections , its the tool for professional users in Adobe Photoshop.

any computer graphics technician who does not master the Pen Tool can be considered not qualified as it’s the most used tool in all photo manipulations and design creation in Photoshop or in Illustrator or any other design Software.

so controlling and mastering the Pen Tool is the key that must be in the hand of any successful computer graphics designer and a priority that all beginners in photoshop should learn as a first lesson.

in this guide we are talking specifically about selection in Adobe Photoshop , so we wont explain how to draw shapes using the Pen tool , but we will Go ahead and explain how to make selections using the Pen Tool.

to use the Pen tool for selection first there are some rules that we should learn about and understand to master the usage of this advanced selection tool.

there are three types or methods to follow when using the Pen tool to make selections.

1- on the edge line
2- outside the edge line
3- inside the edge line

Each method of the three mentioned above is used in a specific condition , let me give you some examples so you can figure out and understand the principles of these three methods :

for example you can apply the first selection method in some situations when your selection should be precisely on the edge line , in situations like when you want for example to change the color of eyes or when changing dress color , in this case you should use the Pen tool to place anchor points carefully on the edge line to prevent leaving any visible color difference inside or outside the edge after changing the color. see the examples below !

the second method is usually used when you want to remove something from an image so to prevent keeping any remains from the deleted object we should apply the second manner and using the Pen tool to place anchor points outside the edge line.

the third method is the mostly used one and usually you should apply it when you want to delete the background behind the subject and to prevent keeping any visible remains from the surrounding color around the subject or the object you want to separate from the image.

Now it’s time to get familiar with the Pen tool itself and learn how to create a perfect path to do selections , the best way to learn something is by practicing so let’s practice using the Pen tool step by step to understand how to deal with it in Adobe Photoshop.

first run you Photoshop software and Download the tutorial files you will need to watch and follow the steps in the tutorial :

i hope this guide was helpful for you, Thank you for taking your time reading and watching the tutorial , if you have any questions or thoughts regarding the Tutorial please Contact us or leave us a comment below, we will be glade hearing from you.

Please make sure you follow our pages on pinterest and facebook as well subscribe to our youtube channel to get informed each time we post new articles and tutorials.

hdesigntutorials

Leave a Reply

Your email address will not be published.